
Unlike Windows and macOS, Linux comes in many alternative forms, called distributions. And the difference between distributions can be very large, especially to the non-initialized.
If you already know which distribution you need, you can, of course, skip this step.
For those who don’t know, I would advise you to start with a distribution that has a graphical user interface, which is more similar to Windows interface (it has a start menu etc).
In this tutorial we are going to install Debian Stretch cli for server.
Steps involved in this configuration
- Debian sever OS Installation
- Basic Server Configuration
- DHCP Configuration
- Bind9 Configuration
- IP Tables Configuration
What is Debian OS and its code names
Debian is a free operating system for your computer. An operating system is the setof basic programs and utilities that make your computer run.
- Release 1.1 is buzz
- Release 1.2 is rex
- Release 1.3 is bo
- Release 2.0 is hamn
- Release 2.1 is slink
- Release 2.2 is potato
- Release 3.0 is woody
- Release 3.1 is sarge
- Release 4.0 is etch
- Release 5.0 is lenny
- Release 6.0 is sqeeze
- Release 7.0 is wheezy
- Release 8.0 is jessie
- Release 9.0 is stretch
- Release 10.0 is buster
Debian OS Installation
- Turn on your personal computer.
- Insert USB device.
- Go to show application and select make startup disk.
- Click the other option and select the Debian OS.
- After selecting the debian os, Click Make Startup Disk option to start the booting process.

Debian OS Installation
- Press Esc or F12 key to enter bios menu.
- USB HDD should be listed below. Use the arrow keys to select USBHDD then press enter.
- Now proceed to boot operating system from USB drive
- If we Select Graphical install option to install operating system via Graphical.

5. If we Select Install option we can install operating system via cli.

6. If we Select Advanced options it shows the some options to make install easier.

7. If we select the help menu, it displays the help options.

8. If we select Install with speech symthesis option the following screen will appear.

9. Select a language to use for the system. Select required option and select continue.

10. Then it asks the Location for the time zone, select time zone and click continue.

11. Then it asks the keyboard layout for the operating system. Select the required option and click continue.

12. Then it automatically loads the attached network configuration or it loads the network configuration from the dhcp and also it loads the ipv4 and ipv6 configurations.

13. Then it asks the hostname for operating system. Enter the hostname and select continue.

14.Then it asks the domain name to configure the network in the operating system. Enter the domain name and click continue

15. Then enter the password for the user.

16. Then it asks the full username for the user, enter the username and click next.

17. Then it ask the username for the account, enter the username and click continue.

18.Then it asks the root password, enter the root password and click next.

19.In partition disk menu, if we select the guided-Use entire disk option it uses the entire disk without LVM, if we select use entire disk and setup LVM option it uses the entire disk and converts it to LVM. If we select use entire disk and set up encryption LVM option it use the entiredisk with encrypted LVM, If we select the Manual we can configure the disk manually.

20.The next tab show the Hard disk, select the hard disk to install the operating system and click continue.

21.The following menu shows the several different schemes for the disk, If we select first option it stores the /home , / , /usr , /bios , /swap as one partition. If we select the second option it separates /home partition from /(root directory). If we select third option it separate the /tmp, /var and /home partitions. select required option and select continue

22.The following window show the free space, mounting points and file system. Click undo changes to partition option to revoke the disk changes. If we select the Finish partition and write change to disk option to begins to install operating system. Select option and click continue.
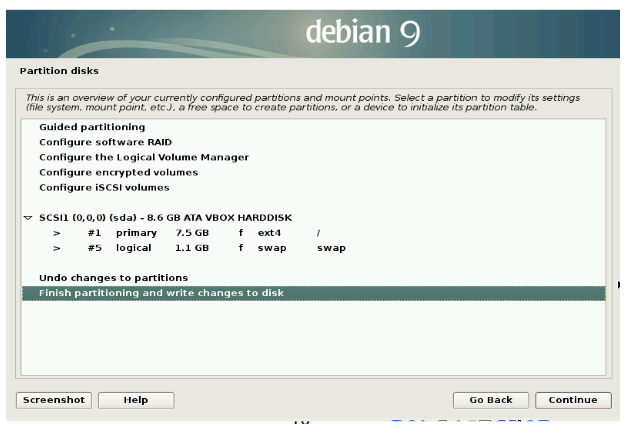
23.Then it ask to confirm the changes. we accept the changes by clicking yes option, If we select no to cancel the changes. Select required option and click continue.

24.Then it install the system configuration. This step takes several minutes.

25.The network mirror window helps you to automatically download the ropos. If we select yes it automatically configure the source list. If we select no we have to manually add the repos to source list after installing the operating system. Select required option and click continue.

26.The next window shows the package usage survey. If we select yes we can answer the survey, If we select no we cannot answer the survey. Select required option and click continue.

27.Then it asks software select, If we select Desktop environment it installs the GUI environment. If we doesn’t select GUI option, it automatically loads the CLI mode.

28.Then it loads the selected softwares.

29.The next windows helps to install GRUB option. If we select yes option we can install multiple operating system without affecting the system. If we select no it may affect the system program files.

30.If we select yes option in GRUB menu, then it asks the device to install. In this menu It shows the hard drive, we also can install GRUB menu manually. Select required option and click continue.

31.If we proceed to install GRUB, it begins to install GRUB on the next screen.

32.After all those steps are completed. Then it asks to remove installation medium to enter the new environment.

33.After installation completed, it will appear on the screen.

Basic Configuration
- Add the repos to the source list and install the following packages.
- Assign the ip address for two interface and check the connectivity by using ping command.
- To configure the basic network configuration option. Install the net-tools package.
sudo apt install net-tools
Configure Network Interface
- Configure the network interface by edit the interfaces file.
- To configure the interfaces file we should have the super privilege.
sudo nano /etc/network/interfaces3.Assign the static ip by using the file and check it by using the following command.
ip a
DHCP Service Configuration
- Install the isc-dhcp-server to configure the dhcp.
sudo apt install isc-dhcp-server
2.Configure the dhcp service after the installation completes.
3.we should configure the dhcp service by edit the dhcp.conf file
4.It requires the super user privilege to edit the file.
sudo nano /etc/dhcp/dchpd.conf5.The file contain the domain name, starting ip address, boardcast address,netmask , domain routers and also the range for the ip address.

6.We can assign the static ip address from dhcp service.
7. By using the following pattern we can only release the limited ip depends on the host’s mac basic.

8.After editing the file. Restart the service by the following command.
sudo systemctl restart isc-dhcp-server9.To view the status for the dhcp service.
sudo systemctl status isc-dhcp-server10.We also can view the releasing ip
11.We can start the service by the following command.
sudo systemctl start isc-dhcp-server12.We can stop the service by the following command.
sudo systemctl stop isc-dhcp-serverDHCP Releasing Port Configuration
- We configure the port for releasing ip.
- It release the Ips from the dhcpd.conf files (/etc/dhcp/dhcpd.conf).
- Ip release by using this file.
- To edit this file it requires super user privilege.
- To edit the file we use the following command. Edit and save the file.
sudo nano /etc/default/isc-dhcp-server
6. We can following to view the releasing ip.
sudo systemctl status isc-dhcp-serverIPTable Configuration
- We use the iptables for nating purpose.
- And we also can configure the input, forward and output chain.
- We use the IPTables for security purpose.

4.We use the IPTables for block the port and also the websites.
5.We use the IPTables for port forwarding.
6.We can install the iptables by the following command
sudo apt install iptables-persistent
Port Forwarding
- We use the following file to forward the packet that support for both ipv4 and ipv6.
- Uncommand the net.ipv4.IP_forward=1 to enabling the packet forwarding for ipv4
- We also can enabling the packet forwarding for ipv6
- We configure the file by the following command
sudo nano /etc/sysctl.conf5.To edit the file it requires super user privilege.
6.If we wrongly configure the file, it will affect the release of ip from dhcp service.

Bind Service Configuration
- Install the bind package by the following command.
sudo apt install bind92.We configure the bind package for the name service.
3.If we doesn’t configure the file, the client machines could not use the domain name to search.
4.We also use the Bind package to block the websites.
5. We can create a log for bind package.
6. BIND’s configuration consists of multiple files, which are included from the main configuration file
7.Zone files, which contain information about a particular namespace, are stored in the named working directory

Db.domain file
- This file is the main configuration file for the DNS file.
- It not necessary to use the default name. We also can use the different file name.
- Most entries in the zone data files are called DNS resource records
- A file that maps hostnames to IP Addresses will be called db.domain
- We configure the file by the following command.
sudo nano /etc/bind/db.netdomain.in6. To edit this file it requires super user privileges.

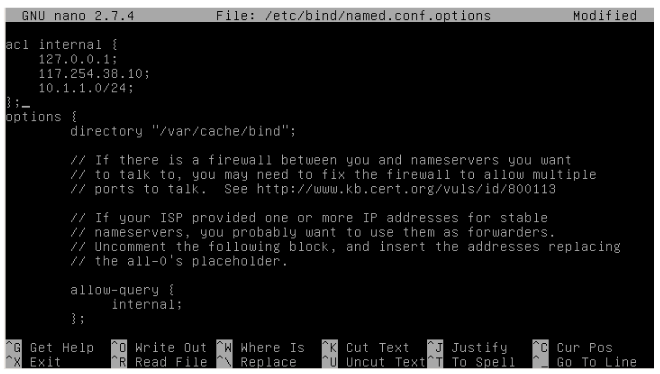
Db.named.conf.option File:
- We will be using the same ACL list to restrict our DNS server to a specific list ofclients. However, we need to change the configuration so that the server no longer attempts to perform recursive queries itself.
- This file contains all the configuration options for the DNS server
- We also can place the nameserver between firewall and network.
- This file allows you to use multiple ports.
- This file filter the queries by using the ACL.
- To edit this file it requires super user privilege
- Edit the file by the following location.
sudo nano /etc/bind/named.conf.options8. acl<acl-name> — Configures an access control list of IP addresses to be allowed or disallowed certainnamedservices. Most of the time, individual IP addresses or IP network notation is used identify the exact IPs.
Named.conf.local file:
- This file contains the local DNS server configuration, and this is where you declare the zones associated with this server’s domain(s).
- Reverse name resolution zone requires the first three blocks of the IP address tobe reversed and “.in-addr.arpa” to be included after them. This allows the single block of IP numbers used in the reverse name resolution zone file to be correctly attached with this zone.
- The file maily created for the reverse lookup zone
- To edit this file it requires root privilege.
- We can edit this file by the following
sudo /etc/bind/named.conf.local
Db.ip file:
- This file containing default forward, reverse, and broadcast zones.
- PTR — PoinTeR record, designed to point to another part of the namespace.
- PTR records are primarily used for reverse name resolution, as they point IP addresses back to a particular name
- SOA — Start Of Authority record, proclaiming important authoritative information about the namespace to the nameserver.
- IPs are pointed to corresponding FQDNs
- To edit this file it requires root privilege.
- To edit this file, enter the following command.
sudo nano etc/bind/db.108.We assign to pointer in this file for the FQDN.

RPZ .zone File:
- RPZ provides a way to “rewrite” a DNS response. Normally a rewrite would return an NXDOMAIN, or “no such answer” response for a query whose return data matches an RPZ “trigger”.
- We can configure the rpz.zone in following location.
sudo nano /etc/bind/rpz.zone3. It requires root privilege to edit this file.
4. It block the website by the domain name.
5. It also generate the log for the users who viewed the sites.
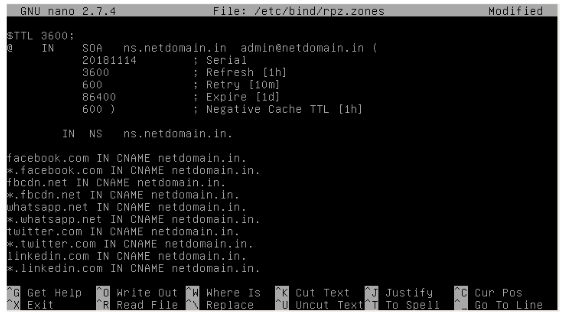
6. If the users search the blocked sites. It provides the following error.

Basic Bind commands:
- We can start the bind service by the following command
sudo systemctl start bin92.We can stop the bind service by the following command.
sudo systemctl stop bind93.We can restart the bind service by the following command.
sudo systemctl restart bind94.We can view the bind status by the following command
sudo systemctl status bind9
5.To change state of bind9 it requires root privilege.

6. We can view the version of bind by the following command.
` named -vNOTE:
We use some arguments in server configuration. The meaning for the arguments given below.
- Comments: start with a semicolon (;)
2. Directives: start with a dollar sign ($)
3. Resource Records: aka DNS records
4. The $TTL directive defines the default Time to Live value for the zone, which is the time a DNS record can be cached on a DNS resolver. This directive is mandatory. The time is specified in seconds.
5. The $ORIGIN directive defines the base domain.Domain names must end with a dot (.), which is the root domain. When a domain name ends witha dot, it is a fully qualified domain name (FQDN).
6. The @ symbol references to the base domain.
7. IN is the DNS class. It stands for Internet. Other DNS classes exist but are rarelyused.
Conclusion
By using the above steps the debian server operating system installation and configuration has been completed successfully. :)

